This week I’ve been practicing some Adobe Illustrator and making isometric graphics. I thought I’d share how to set up an Illustrator file so you can experiment with this style of perspective yourself!
What is Isometric?
Isometric means having equal dimensions. Its etymology is derived from the Greek words “isos” and “metron,” meaning equal measure.
Take a look at these here cubes!
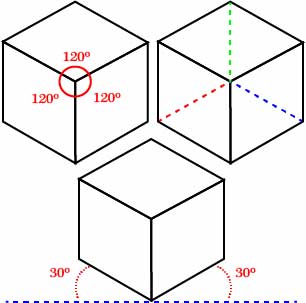
As you can see, there are some interesting symmetrical features. For example, notice how in this cube, three axes intersect, all of which are of an equal degree from the intersection. Similarly, notice how two axes are rotated 30 degrees from the horizontal line imagined at 0 degrees. This intersection of lines at 30 degrees forms the basis of our grid. So let’s fire up Illustrator!
Process
After you’re loaded up, you need to make an artboard. For demonstration purposes, this artboard is 1000 x 1000 px.

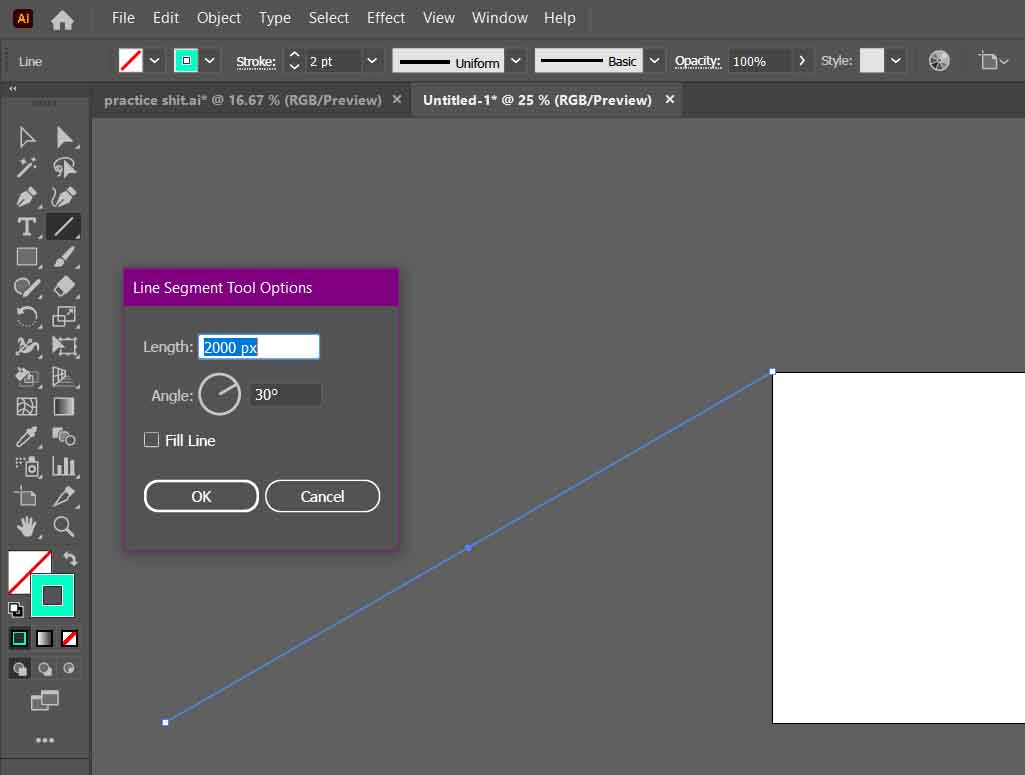
Next, you will create your first 30-degree axis. You can create a line with the precise dimensions you require using the Line Segment Tool. The angle needed is 30 degrees, and its length… well… if you remember your trigonometry, you will know that a diagonal line (the hypotenuse) is 2x its opposite (the shortest of the three lines) in a 30-60-90 triangle.
So, therefore, for this line segment to reach the bottom of our artboard, it must be twice the length of its side. In my case, the line segment is 2000 px.
As you can see, the line segment must align with the top left point of the artboard.
Afterwards, you need to duplicate your line segment. You can hold alt/option+click and drag, or with the segment selected, copy and paste it.
What is important is the bottom of your copied line aligns with the bottom right point of your artboard.

With both lines selected, go to Object>Blend>Make. Then define your blend options by going to Object>Blend>Blend Options…

In the Blend Options, set the Spacing to Specific Steps. After, you must decide how many intervals you will have between each point.
This next part needs brainy time.
I set this axis to step 50 times between its two points. However, that does not mean 1000 px / 50 = 20 px/step. We need more trig to figure this out.
We know the Opposite side is 1000px, and the Hypotonuse is 2000 px. As we may recall from math class, the Adjacent side (the longer of the two non-diagonal lines) of a 30-60-90 triangle is Opposite√ 3.
In this case, 1000√ 3 ≈ 1732.05 px.
So, therefore, we know the distance between each interval is ≈ 34.64

Next, we duplicate our line segments rotated 30 degrees in the opposite direction. But instead of repeating the process, we can transform our newly created array of lines.
Select the lines and right-click. Go to Transform>Reflect.

Ensure that your axis is set to vertical, and afterwards, click Copy to duplicate your selected lines into their newly reflected position.

It’s possible to create one more line segment and repeat the process. All you need to do is duplicate and rotate the third copy with an angle of 90 degrees.
But honestly, you don’t need it to get started. These two intersecting lines are all you need to draw your own isometric graphics. Just remember to place your grid on a separate layer and lock it. Afterwards, grab your pen tool and have at ‘er!
Here’s what I did during this tutorial. Most of these shapes are accessible through a Google Search

And one more without the grid.

There you have it!
Let me know if you found this helpful! Happy Designing!